Creating a working form is a basic but important part of developing a dynamic website. It allows you to collect information about your site's user which you can use to generate user-specific content for your site.
In this Tutorial...
The Form
HTML forms have several elements that we can take advantage of when creating our site's registration form. Some of the most common elements are:
For our simple registration form, we will be using the input box to collect a username and password: the selection box to store the user's favorite method of transportation: the submit button to submit the form and begin processing.
Writing the HTML
The first part of writing the HTML is to write the opening and closing form tags. The form tag must specify two things:
The code so far:

Next, let's add 2 Text boxes: Username, Password
Below shows the additions to our code:

Let's add a selection box for the user to choose their favorite method of transportation. There are two tags that we use to write a selection box.
Below shows the additions to our code:

Finally, we need to add a submit button to the form. This allows our form to be submitted and will re-direct to the page that we specified in the action of the form tag (until we write the PHP processing code, the form will not do much).
For the submit tag, we once again use the INPUT tag. For a submit button, we set type="submit." We also need to give a name to this element. I used the name ="Submit_form." For a submit button, we also want to specify a value, which is the text that the user will see on the button. I used: value="Join My Site."
Here is the final image of the HTML code for our registration form:
Copy the Code
Below you can copy the code from Part 1 of the tutorial. Tomorrow I will go through the steps of processing the form with PHP.
And... Here's what it looks like so far:
Username:
Password:
So... not much to look at yet, but we'll fix it up soon!
Thanks for reading Part 1 of Creating/Processing a Registration Form! If you have any topics that you would like me to blog about, leave me a comment.
In this Tutorial...
- HTML - You will use basic HTML to create a simple form
- PHP - You will use php to process the form, connect to a database, store user information and save the stored information in SESSION variables.
- MySql - You will use MySql and PHPMyAdmin to store the information from the form.
The Form
HTML forms have several elements that we can take advantage of when creating our site's registration form. Some of the most common elements are:
- Text Box
- Radio Box
- Check Box
- Selection Box
- Submit Button
For our simple registration form, we will be using the input box to collect a username and password: the selection box to store the user's favorite method of transportation: the submit button to submit the form and begin processing.
Writing the HTML
The first part of writing the HTML is to write the opening and closing form tags. The form tag must specify two things:
- Method (POST or GET) - This determines whether we will get the form variables from the URL. If we use GET, the variables will be displayed in the URL. For this tutorial, we will use POST.
- Action - We will set the action equal to the address of the website where we will use PHP to process our form. For this example, I have called the page: process_form.php
The code so far:

Next, let's add 2 Text boxes: Username, Password
- For the Username, we will use an input tag. Note: There is no closing Input tag. For the input tag, we need to specify a name so that we can refer to the value later in our php code. For this tutorial, I used "username." We also need to specify a type. For the username, we will set our type="text"
- For the Password, we will use the input tag again. This time, I set the name= "password" and the type="password." The reason that we set the type to password in this case is so that the password is not visible across the screen.
Below shows the additions to our code:

Let's add a selection box for the user to choose their favorite method of transportation. There are two tags that we use to write a selection box.
- We use an open and closed SELECT tag. In this tag, we specify the name of the form element. In the tutorial, I set name="transportation."
- Inside the SELECT tag, we use an open and closed OPTION tag. Here we need to specify a value, which is what we will store if the user selects this option. I set the value of each option equal to the display text. However, these do not need to match up.
Below shows the additions to our code:

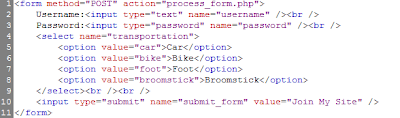
Finally, we need to add a submit button to the form. This allows our form to be submitted and will re-direct to the page that we specified in the action of the form tag (until we write the PHP processing code, the form will not do much).
For the submit tag, we once again use the INPUT tag. For a submit button, we set type="submit." We also need to give a name to this element. I used the name ="Submit_form." For a submit button, we also want to specify a value, which is the text that the user will see on the button. I used: value="Join My Site."
Here is the final image of the HTML code for our registration form:

Copy the Code
Below you can copy the code from Part 1 of the tutorial. Tomorrow I will go through the steps of processing the form with PHP.
And... Here's what it looks like so far:
Username:
Password:
So... not much to look at yet, but we'll fix it up soon!
Thanks for reading Part 1 of Creating/Processing a Registration Form! If you have any topics that you would like me to blog about, leave me a comment.
Thanks! Onward to part 2...
ReplyDelete